

However if you are willing to get a little creative, Google Drawings can serve as a good option for some desktop publishing needs. Google Drawings is a very flexible program, allowing you to add text boxes, wordart, images, shapes, and more, to any part of the Drawing, and at any angle, much like a desktop publishing program would.
One such project you can achieve with Google Drawings is creating a poster.
To try this out, I recently used Google Drawings to make a chemistry-themed poster that could be displayed in a Science classroom. See below for some tips and tricks on how to use Drawings to make a poster, as well as download links to get your own copy of the Chemistry poster for your classroom or your science-teaching colleagues.
The Finished Product - Elemental Love
For this blog post, we will start with end product to see what you can make with Google Drawings, and then go backwards to take a look at some tips and tricks to help you do the same. For this example I made a poster out of a Chemistry-themed poem (which I made as part of an earlier post on a "Random Writing Prompt Generator with Google Sheets").

If you want to download a printable PDF version of the poster, feel free to use the links below:
- "Elemental Love" poster (white background) - PDF link
- "Elemental Love" poster (yellow background) - PDF link
 Tips and Tricks for Making Posters
Below are some helpful options and ideas to use when creating a poster with Google Drawings. Again, Drawings is not a full-featured desktop publishing tool, but it is easy to use, and with a few tips and tricks you and your students can make a creative final product.
If you want even more details and directions on how to use Google Drawings, see my help guide: "Using Google Drawings".
Change page size
One of the first things to realize is you do not have to leave your Drawing canvas in the default size, which is 10 inches by 7.5 inches. Drawings allows you to adjust the dimensions to fit whatever project you are working on. For example, you may want your poster to be in portrait, rather than landscape orientation, or a larger size such as 11 inches by 17 inches.
Here's how to change the canvas size:

- Click "File" in the top menu of Drawings.
- Choose "Page setup" from the drop-down menu.
- In the drop-down menu, switch from "Standard 4:3" to "Custom".
- For the measurement units you can choose from "Inches", "Centimeters", "Points", or "Pixels".
- You can now type in the length and width you want.
- Click "OK" when done and your Drawing canvas will be resized.
Change background color
Another change you may want to make for your poster is to select a different background color. By default, your Drawing starts off with a transparent background (looks like a checkerboard pattern) so you don't really have any color at first. You can change the background color as follows:
- Right-click on a blank area of your Drawing canvas.
- From the pop-up menu, choose "Background".
- You can now choose from one of the pre-selected colors.
- Or you can click "Custom" to choose any color.
- Or you can click "Gradient" to select a light-to-dark color blend.

Choose cool fonts
If your poster has text, you can easily add that by clicking "Insert" and then "Text box". You can then format the text with normal options such as bold, italic, underline, font color, and font size. However, to really make your poster pop, consider changing the font face.
By default, you will only have a dozen or so font faces listed in your "Font" drop-down menu. However, Google has provided over 800 additional web fonts to choose from, covering most any look and feel you could possibly want. To access these additional fonts, do the following:
- Click on your "Font" menu (which will probably display "Arial" as the default font).
- Choose "More fonts" from the drop down menu.
- This will now open the web fonts window where you can browse through hundreds of available fonts.
- You can also narrow down the list to show only "Display", "Handwriting", "Monospace", "Serif", or "Sans Serif" fonts.
- When you find a font you like, simply click on it to select it.
- When you click "OK" that font will now be added to your font list and will be ready to use.

Insert images
Most posters will have graphics, and Google Drawings provides loads of ways to add images to your creation. Below are several options for adding pictures.
Insert Menu
The most common method for adding a picture is to click "Insert" then "Image". This will open a window with six options for adding a picture.
- Upload - Add an image saved on your local hard drive.
- Take a snapshot - Use your webcam to take a picture.
- By URL - Paste in the link to an image online.
- Your albums - Choose an image from your Google Photos (if you use that service).
- Google Drive - Grab a picture saved in your Drive.
- Search - Run a Google search for images that are free to use.

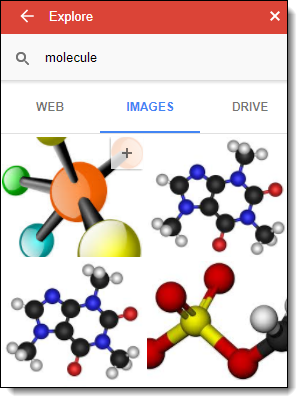 Explore Tool
A second option for inserting images is to use the "Explore" tool. This allows you to run a quick search for images, which you can then easily add to your Drawing.
- Click "Tools" in the top menu bar.
- Then Click "Explore" from the drop-down menu.
- This will open the Explore panel on the right side of the screen.
- Now type in a search term and then choose the "Images" tab to see the results.
- If you find an image you wish to use, hover above it and click the "+" button to insert it into the Drawing.
Edit images
Now that you have images added to your poster, you may need to edit the pictures. There are several options for tweaking the images.

- Move - Simply click and drag the images to move them around the canvas.
- Resize - To make the image smaller or larger, click and drag the blue squares in the corners of the image.
- Crop - Double-click on an image to go into crop mode, where you can drag the black bars on the edges to crop off portions.
- Crop to a Shape - Select and image and then click the down arrow next to the "Crop" button in the toolbar to select a shape to crop the image to. This will cut out the image into the shape chosen.
- Rotate - Click and drag the blue circle coming from the top of the image to rotate the picture as needed.
- Order - If you need to move an image in front of or behind another image, select the picture, then click "Arrange", followed by "Move forward" or "Move backward".
Align objects
If you have several elements on your poster, you may need to line them up consistently or divide them evenly across the Drawing. This can make a much more organized and professional look to the layout. This can be done as follows:
- Select all of the items you wish to adjust.
- Next click the "Arrange" menu and choose one of the following:
- Align horizontally - Line up all the items "Left", "Right", or "Center"
- Align vertically - Line up all the items "Top", "Middle", or "Bottom"
- Center on page
- Distribute - Space out the items evenly

Exporting the final product
When done creating the poster, the final product can be shared in several ways:
- Share the Drawing using the "Share" button to make the poster available digitally to others.
- Print the poster directly from Drawings to hang up in your school.
- Embed the Drawing into a Google Site (from "Insert" tab choose "From Drive" to select the Drawing).
- Export the Drawing as PDF (click "File" then "Download as") to give people an easy to use digital copy of the poster.

Conclusion
Although Google Drawings is not technically a desktop publishing tool, it can be used creatively to make posters, as well as many other types of publications. Using some of the tips above, you and your students can make your posters more artistic, professional, and expressive of your ideas.
Post by Eric Curts. Bring me to your school, organization, or conference with over 50 PD sessions to choose from. Connect with me on Twitter at twitter.com/ericcurts and on Google+ at plus.google.com/+EricCurts1
Eric, When printing a larger than 8 x 11, how do we set the print options to print 4 connecting pages to piece together to create a larger poster (as in Microsoft Publisher).
ReplyDeleteJoyce, one option would be to download the poster as an image, and then use the free website Block Posters to print it out in multiple pieces. The site is at: http://www.blockposters.com
Deletei wonder..... with photo editing software (photoshop)(or even pixlr.com) would an 11x17 image print out correctly on multiple pages or resize to fit page?
DeleteLove, love, love Google Drawings! So simple and slick. I'm just waiting for the day when they make an iPad app for it :-)
ReplyDeleteWow
ReplyDeleteCool
ReplyDelete