This is also true for students and the writing they do in school. At least it should be true. Students should not just write their essay, paper, report, or story once, then turn it in and be finished with it. A critical part of writing is getting feedback, making changes, adding new content, and trimming out what is not needed. And then doing it again. And again.
Thankfully Google Docs has always made it easy for students to write, and then for teachers and peers to leave feedback (text, voice, video, and handwritten), and then for students to make changes to their work.
Now though, it is even easier for teachers and students to keep track of those big mile markers when a paper goes from rough draft to revised draft to final copy. Recently Google gave Revision History a face lift, renaming it to Version History and adding the new ability to name specific versions.
See below how this new process works, and how you and your students can use this to improve the clarity of the editing process.
What is Version History
First, the basics… Version History is the new name for Revision History. Basically whenever someone makes a change to a Google Doc (or Slides, Sheets, Drawings, etc.) Google tracks each change, who made the change, and when it was made.
This is a powerful tool to see everything that has happened during the writing process. For six ideas on how this tool can be used, see my earlier post "6 awesome uses for Revision History" (back when it was still called Revision History.)
 To access Version History you need to have edit rights to a document, then do the following:
- Click "File" then "Version history" then "See version history".
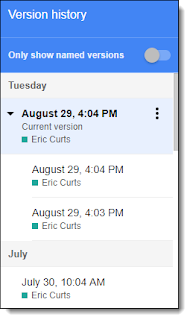
- This will now open a panel on the right.
- In the panel you will see entries for all the changes made to the document, along with the date, time, and person who made the change. Each person will have their own color code.
- When you click on an entry, the document will refresh to show you the changes that person made, highlighted in their color code.
- You can also hover above the changes in the document to see the person’s name in a pop-up.
- If you want to see the changes broken down in smaller time increments, click the triangle to the left of the entry.
Naming Versions
The new feature that has been added to Version History is the ability to name specific versions of the document. This can be very helpful when working on a project that will go through several cycles of writing, then feedback, the revising, then more feedback, and such.
For example you may have due dates set for several key versions of the project to be done such as:
- Rough Draft
- Revised Draft
- Final Version
Instead of having Version History be one giant list of dates and times and changes, you can now name certain versions of the file. When it is time to turn in the first rough draft, that version can be named "Rough Draft" in the Version History. Here's how:
- With the document open, click "File" then "Version history" then "See version history".
- The Version History panel will now open on the right.
- Expand the entries as needed with the triangle buttons to the left of an entry.
- Find the version you are looking for. For example it may be based upon the due date and time you have set for the draft to be complete.
- Now click the "3 Dots" button to the right of that entry.
- Choose "Name this version" from the drop-down menu.
- You can now type in the name for the version, such as "Rough Draft".
- This can be repeated as needed when new versions are due.
- This process can be done by the student when submitting their current draft, or by the teacher when reviewing the student writing (if desired).
Now when it is time to compare the "Final Version" to the "Revised Draft" to the "Rough Draft" it will be much easier to quickly identify the versions you are looking for.
You can even make this even easier by doing the following:
- Click the toggle switch button for "Only show named versions".
- This will hide all of the other smaller changes to the document and just show you the key versions you need to explore.
Conclusion
Revision History has always been a powerful tool to investigate student writing. Now as Version History, the option to name versions makes it even easier to see student progress and provide better feedback and assessment. This provides more support for student writing to be a process, with the goal to improve their writing over time with feedback, reflection, and revision.
Post by Eric Curts. Bring me to your school, organization, or conference with over 50 PD sessions to choose from. Connect with me on Twitter at twitter.com/ericcurts and on Google+ at plus.google.com/+EricCurts1


No comments:
Post a Comment