

As the school year winds down, most teachers go through some sort of check-out procedure for their physical classrooms, making sure everything is properly organized or put away for the summer. In much the same way, you may want to do some clean-up and close-out steps for your digital classroom ... Google Classroom.
Google Classroom is a powerful tool to help you and your students collaborate and communicate, but when used year after year, it can start to become a bit of a mess and a management challenge. To help with this, there are several suggestions to consider for Classroom when wrapping up the school year.
See below for six steps that may help you clean up your Classroom as you transition from one school year to the next. However, keep in mind these are all just suggestions and each is optional. While some may not apply to your situation, hopefully several will assist you in keeping your Classroom organized, clutter-free, and efficient for a new year.
(Note: The video below is from 2019 but the content is still relevant. I have updated a few of the images in the written directions to reflect some minor changes, such as "To do" now being called "To review".)
▶️ Tutorial Video (23 minutes)
📄 Tip #1 - Return all student work
One of the great features of Google Classroom is how it streamlines the process for turning in work. When a student turns in an assignment, Google automatically changes the sharing permissions on the file (or files), making you the owner and reducing the student's rights to view-only. This is helpful for grading, but you don't want to leave it this way.
When done grading an assignment you want to make sure to return the files to your students, so the ownership of the files will revert back to the students. This is especially critical if later you decide to clean up your Drive and delete old files. If you are still the owner of the students' work, when you delete it, you are really deleting the file. However, if you have returned the files, you are no longer the owner, so if you delete them, all it does is remove them from your Drive.
So, one of the first tips to consider is to make sure you have properly returned all the Classroom assignments to your students. One way to do this would be:


❌ Tip #2 - Un-enroll students from old classes
Another possible clean-up step is to remove students from the old classes. This may be an option for you if you prefer not to have students accessing content from your class in the future.
For example, this could be for academic integrity issues if you do not want students showing certain course content to new classes in future years. Of course, no cheating-prevention solution is guaranteed, as students can always find many ways around preventative measures. Still though, it is an option that may help.
If you decide you would like to unenroll students from old courses, you can do the following:

🗄️ Tip #3 - Archive old classes
When you are done with a class, a good way to clean up Classroom is to archive the old classes. Archiving is a process that:
 To archive an old class, do the following:
 If you ever need to un-archive a class, you can do so as follows:
🗓️ Tip #4 - Remove old class calendars
When you create a class in Google Classroom, and then make assignments with due dates, this automatically creates a Google Calendar for the class. This is a convenient way for your and your students to go to Google Calendar and see upcoming due dates for classwork and projects throughout the course of the school year.
However, when the year is over and the class is done, you don't really need that calendar showing up anymore. If you have a number of classes, they can quickly clutter up your calendar list. Thankfully there are a couple of easy options for removing the calendars for old classes.
📁 Tip #5 - Move old class folders in Drive
Because Google Classroom automates the sharing and collaborating process, it is easy to forget what is actually going on behind the scenes in Google Drive. For each class you create in Google Classroom, a folder gets created in your Google Drive where all of the assignment documents and other files are stored.
Now you may never open that Classroom folder in Drive, so this tip may not apply to you at all. However, you may choose to browse that folder as another option for easy access to all your students' submitted work. If that is the case, the "Classroom" folder in your Drive can get pretty crowded over the years.
If it helps, you are allowed to move class folders to a new location in your Drive, so only the current class folders are easily visible. Here's how:

Moving class folders does not interfere with their use in Google Classroom in any way. It simply cleans up your "Classroom" folder to make it easier for you to find current classes, if so desired.
🗑️ Tip #6 - Remove old class files from "Shared with me" in Drive
When files get shared as part of a Classroom assignment, sometimes the files will also show up in the "Shared with me" area of your Google Drive. If you have a lots of students and lot of assignments, this can cause quite a mess in "Shared with me".
Now I am of the philosophy that it is not really worth the fight to try to keep "Shared with me" clean or organized in any way. I tend to think of it as Grand Central Station and just accept the fact that it will always be a mess.
However, if you really want to clean up "Shared with me" you are allowed to remove files from there. So you may want to consider getting rid of old files from this year's classes.
First though, two quick but important notes:
To remove a file from "Shared with me" do the following:

📑 BONUS: Delete Old Classroom Bookmarks
Here is an extra bonus piece of advice I got from a good friend. Sometimes we try to make navigation easier for our students my having them add a bookmark directly to our Classroom page, rather than the Classroom site in general. That can certainly help save a click or two on a day to day basis, but can become confusing the next year when that class is no longer active.
If you have a practice of having your students add bookmarks for you Classroom page, also be sure to have an end-of-year practice of reminding your students to delete those old bookmarks. Again, this will help for a much smoother launch in the new school year.
🏁 Conclusion
Google Classroom is a wonderful tool to help you and your students share documents, have discussions, access resources, and more. However, even something as useful as Classroom can become cluttered and less efficient if we fail to manage it well. Hopefully some of the tips shared above will be useful for you, and will help keep your Classroom running smoothly.
If you have other suggestions for end-of-year clean-up and management of Classroom, please share them in the comments below.
▶️ Tutorial Video (23 minutes)
📄 Tip #1 - Return all student work
One of the great features of Google Classroom is how it streamlines the process for turning in work. When a student turns in an assignment, Google automatically changes the sharing permissions on the file (or files), making you the owner and reducing the student's rights to view-only. This is helpful for grading, but you don't want to leave it this way.
When done grading an assignment you want to make sure to return the files to your students, so the ownership of the files will revert back to the students. This is especially critical if later you decide to clean up your Drive and delete old files. If you are still the owner of the students' work, when you delete it, you are really deleting the file. However, if you have returned the files, you are no longer the owner, so if you delete them, all it does is remove them from your Drive.
So, one of the first tips to consider is to make sure you have properly returned all the Classroom assignments to your students. One way to do this would be:
- Click the menu button in the top left corner of Classroom
- Choose "To review" from the drop-down menu.

- This will show you all of the assignments from all of your classes.
- You can narrow it down to just one class at a time if needed by choosing a class from the "All classes" drop-down menu at the top.
- For each assignment you can click on the "Turned in" link to view the student submissions.

- You can now look for any student work that is marked as "Turned in" rather than "Graded".
- Select those students, add a grade if still needed, and click the "Return" button at the top to return them to the students.
- When done checking an assignment you can go back to the "To review" page and move it into the "Reviewed" section by clicking the three-dots menu and choosing "Mark as reviewed".
- Repeat as needed.
❌ Tip #2 - Un-enroll students from old classes
Another possible clean-up step is to remove students from the old classes. This may be an option for you if you prefer not to have students accessing content from your class in the future.
For example, this could be for academic integrity issues if you do not want students showing certain course content to new classes in future years. Of course, no cheating-prevention solution is guaranteed, as students can always find many ways around preventative measures. Still though, it is an option that may help.
If you decide you would like to unenroll students from old courses, you can do the following:
- Open the course and go to the "People" tab.
- Check the box at the top of the "Students" section to select all the students in the class.
- Click the "Actions" button.
- Choose "Remove" from the drop-down menu.
🗄️ Tip #3 - Archive old classes
When you are done with a class, a good way to clean up Classroom is to archive the old classes. Archiving is a process that:
- Removes the class from your main Classroom home page (making your page cleaner and easier to navigate).
- Freezes the class so no new changes can be made to it (especially helpful if you choose not to remove students from the old classes).
- Still allows you to copy and reuse old posts and assignments from the archived class in your new classes.
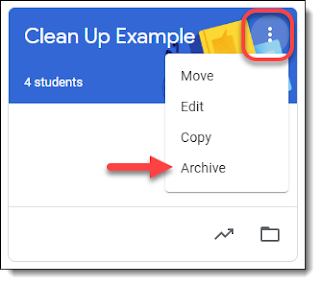
 To archive an old class, do the following:
- Go to the home page of Classroom
- Click the three-dots menu in the top right corner of the "card" for the class you wish to archive.
- Then click "Archive" from the drop-down menu.
- You will now get a pop-up window asking you to verify that you want to archive the class. Click "Archive" again to verify.

- From the home page of Classroom, click the menu button in the top left.
- Scroll down to the bottom of the drop-down menu and choose "Archived Classes".
- Click the three-dots menu in the top right corner of the "card" for the class you wish to un-archive.
- Then click "Restore" from the drop-down menu.
- You will now get a pop-up window asking you to verify that you want to restore the class. Click "Restore" again to verify.
🗓️ Tip #4 - Remove old class calendars
When you create a class in Google Classroom, and then make assignments with due dates, this automatically creates a Google Calendar for the class. This is a convenient way for your and your students to go to Google Calendar and see upcoming due dates for classwork and projects throughout the course of the school year.
However, when the year is over and the class is done, you don't really need that calendar showing up anymore. If you have a number of classes, they can quickly clutter up your calendar list. Thankfully there are a couple of easy options for removing the calendars for old classes.
- Go to Google Calendar.
- You should see the names of your classes in the list under "My calendars" on the left side of the screen.
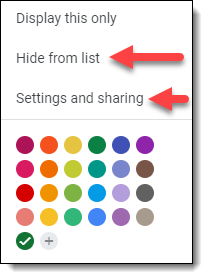
- To remove an old class calendar you will need to access that calendar's settings.
- Click the three-dots button to the right of the class name in the "My calendars" list.
- If you just want to hide the class calendar from your list, simply click "Hide from list".
- If instead you want to delete the calendar, click "Settings and sharing".
- You can now scroll down to the bottom of the calendar details screen and in the "Remove calendar" section click "Delete".
- This will open a pop-up window asking you to confirm the deletion.
📁 Tip #5 - Move old class folders in Drive
Because Google Classroom automates the sharing and collaborating process, it is easy to forget what is actually going on behind the scenes in Google Drive. For each class you create in Google Classroom, a folder gets created in your Google Drive where all of the assignment documents and other files are stored.
Now you may never open that Classroom folder in Drive, so this tip may not apply to you at all. However, you may choose to browse that folder as another option for easy access to all your students' submitted work. If that is the case, the "Classroom" folder in your Drive can get pretty crowded over the years.
If it helps, you are allowed to move class folders to a new location in your Drive, so only the current class folders are easily visible. Here's how:
- Go to Google Drive and select the "Classroom" folder.
- If you do not already have a place to move the old class folders, create a new folder by clicking "New" and "Folder".
- Name it something like "Archive" or "Old Classes" or such.
- You can now simply drag and drop the old class folders into the new folder you have created.
Moving class folders does not interfere with their use in Google Classroom in any way. It simply cleans up your "Classroom" folder to make it easier for you to find current classes, if so desired.
🗑️ Tip #6 - Remove old class files from "Shared with me" in Drive
When files get shared as part of a Classroom assignment, sometimes the files will also show up in the "Shared with me" area of your Google Drive. If you have a lots of students and lot of assignments, this can cause quite a mess in "Shared with me".
Now I am of the philosophy that it is not really worth the fight to try to keep "Shared with me" clean or organized in any way. I tend to think of it as Grand Central Station and just accept the fact that it will always be a mess.
However, if you really want to clean up "Shared with me" you are allowed to remove files from there. So you may want to consider getting rid of old files from this year's classes.
First though, two quick but important notes:
- Make sure you have returned all the assignments to your students first before you delete anything out of "Shared with me" (see Tip #1 above). Remember that you actually become the owner of a file when a student turns it into you. If you have not returned the file yet, then you are technically the owner of the file, and if you delete the file, it really gets deleted.
- On the other hand, if you are not the owner of a file, and you delete it from "Shared with me" it does not really delete the file. It simply removes it from the "Shared with me" list. The file will still show up in your "Classroom" folders, even when you remove it from "Shared with me".
To remove a file from "Shared with me" do the following:
- Go to Google Drive.
- Click "Shared with me" on the left.
- Select the file (or files) you wish to remove.
- Now you can click on the "Remove" icon in the top toolbar (looks like a trashcan).
- Or right-click on the file(s) and choose "Remove".
- The file(s) will now be removed from "Shared with me".
📑 BONUS: Delete Old Classroom Bookmarks
Here is an extra bonus piece of advice I got from a good friend. Sometimes we try to make navigation easier for our students my having them add a bookmark directly to our Classroom page, rather than the Classroom site in general. That can certainly help save a click or two on a day to day basis, but can become confusing the next year when that class is no longer active.
If you have a practice of having your students add bookmarks for you Classroom page, also be sure to have an end-of-year practice of reminding your students to delete those old bookmarks. Again, this will help for a much smoother launch in the new school year.
🏁 Conclusion
Google Classroom is a wonderful tool to help you and your students share documents, have discussions, access resources, and more. However, even something as useful as Classroom can become cluttered and less efficient if we fail to manage it well. Hopefully some of the tips shared above will be useful for you, and will help keep your Classroom running smoothly.
If you have other suggestions for end-of-year clean-up and management of Classroom, please share them in the comments below.
Post by Eric Curts
📮 Join the "Control Alt achieve" email discussion group
🔔 Get new blog posts automatically through email - FollowIt link
📰 Sign up for my email newsletter
🔗 Watch my "EdTech Links of the Week" livestream - bit.ly/caa-live
🐦 Connect with me on Twitter
▶️ Subscribe to my YouTube channel
📧 Reach out through email - ericcurts@gmail.com
📗 Check out my "Control Alt Achieve" book
🏫 Bring me to your school, organization, or conference with over 60 PD sessions to choose from
Great information! Thank you. I'll share with teachers.
ReplyDeletethank you for this!
ReplyDeleteThank you for your recommendations!!
ReplyDeleteGreat information to utilize. Thank you for posting.
ReplyDeleteI'm torn about returning student work. If they are view only and the teacher is the owner, if the student tries to share with another student you may receive a request for access email. It can be a good red alert to see if a student from the past semester, or year, is cheating.
ReplyDeleteThank you so much for sharing this.
ReplyDeleteReally helpful info! Thank you.
ReplyDeleteDay 2 of Summer Break and I feel like a "NEW" me just from doing a little clean up in My Google Classroom and Google Files. THANK YOU!!
ReplyDelete