As I looked into this many of them were being created with Photoshop or some other graphics editing tool. As awesome as that is, not everyone has access to those tools.
So I asked myself the question I usually ask in this situation, "Is there any way to do this using Google tools?"
And the answer is … YES!
Just using Google Slides, I was able to create all sorts of creative designs by putting photos inside of text, which can be an engaging project for students or for anyone.
▶️ Tutorial Video (16 min)
Or watch on YouTube at: youtube.com/watch?v=yDj7Mo7vGUY
▶️ Webinar Video (90 minutes)
If you want to learn more, I also did a 90-minute live-stream webinar where we did a deep dive into creating Photo Words. In the video I go step-by-step through the process of creating four different advanced designs.
Or watch on YouTube at: https://www.youtube.com/watch?v=u2cjgtWaRPQ
💡 Photo Word Examples and Uses
So the best place to start is at the end. Let's take a look at some of the designs I was able to create. And remember, all of these were created with nothing but Google Slides and public domain or personal photos.
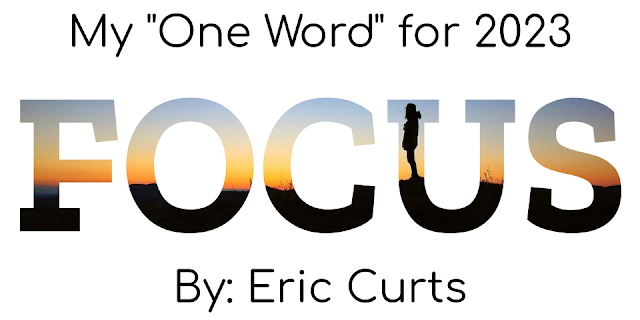
Example #1 - "FOCUS"
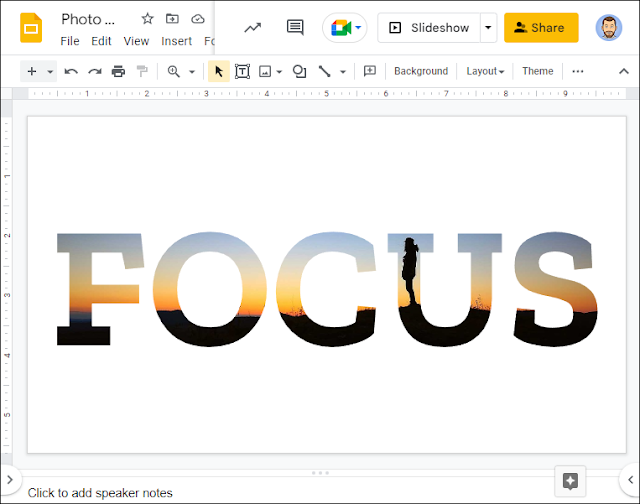
For the first example, here is one I made for my word of the new year. I chose this as my "One Word" because sometimes I get too many plates spinning in the air and I need to focus. So for this design I took the word and put an image inside of it with an appropriately-bearded man looking out on a sunset and thinking.
This could be a fun project for students to pick their "One Word" for the year and insert a picture or pictures that help represent it.
Example #2 - My Name
For my next example, I decided to make a design with my name. Since I do a lot of professional development trainings, I filled each letter of my name with a picture of me speaking at different conferences and schools.
Again this could be an awesome project for students. They could fill the letters of their name with images of themselves or of things that reflect who they are.
Example #3 - "2022"
This next example was actually something I made for a holiday card I created last year. In each number of the year I put a picture of one of my favorite places I traveled to last year, from Florida to Arizona to Maine to right back here in Cleveland.
This is something students could do to wrap up a year, showing some of their favorite memories.
Example #4 - "OHIO"
Speaking of Cleveland, the next example I did was a design with the word "OHIO" which is where I live. In this case I put a map of Ohio inside of the word, and then added a buckeye for our state tree and a cardinal for our state bird.
Students could have fun doing this for any state or country, filling the letters with a map or a flag or pictures from that area. If the name of the state is too long, they could always just use the abbreviation instead.
Example #5 - "NYNY"
Speaking of locations, I got a little more creative with my next example for New York, NY. For this design I put the New York City skyline inside of the letters, but then I let the image continue down below to show the water as well.
Example #6 - "SUNSET"
I did a similar approach for the word "SUNSET" where I put the top half of the picture inside of the word, and then left the bottom half alone. I did change the background color to yellow as I thought that gave it a nice look.
Example #7 - "DIVE"
Then for my next example, I reversed that approach for the word "DIVE". Here I left the top half of the picture alone, and then put the bottom half inside of the word. I also changed the background to black to fit the underwater theme.
Example #8 - "BURGER"
Then I had a lot of fun with the word "BURGER". Here I cut the image into three pieces, leaving the top and bottom alone, and then putting the middle inside of the word "BURGER".
Example #9 - "ZOOM"
And then as a bonus example, I got really carried away and made an animated Photo Word by combining lots of individual slides into a GIF.
All of these examples show that educators and students can do so much with an activity like this.
- Students can make Photo Words to illustrate a concept, represent a vocabulary word, describe themselves or a place or a character, and more.
- Educators can use Photo Words to help students learn a new word by visualizing that word with an associated image.
✅ How to Create a Photo Word
So how do you actually make a Photo Word using Google Slides? Let's take a look at the process.
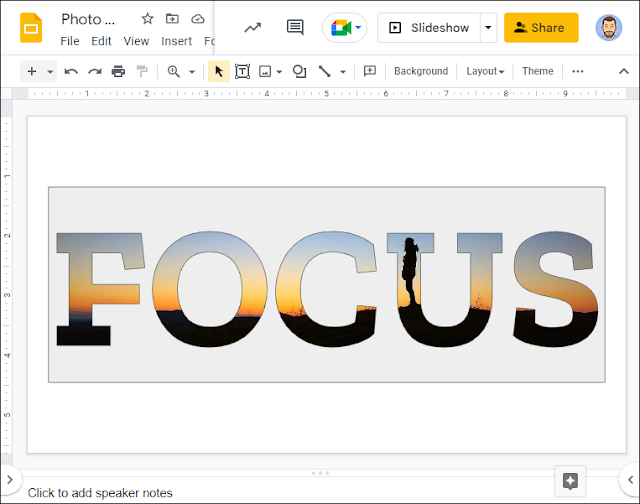
For our step-by-step demonstration, I will be making my word of the year example from earlier where I used the word "FOCUS". This is one of the simpler examples, so it is a good way to learn the basics for creating a Photo Word.
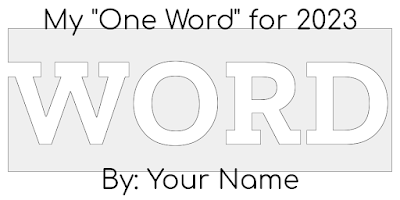
If you need something simpler, I do have a free template for the "One Word" of the year project, that has a few of the items already filled in to get you started. You can get your own copy of that template using the link below:
- "One Word" template - Google Slides link
On the other hand, if you want to do something more advanced than this example, I also did a 90-minute live-stream webinar where we did a deep dive into creating Photo Words. In the video I go step-by-step through the process of creating four different advanced designs. You can access that video through the link below.
- "Advanced Google Slides Photo Words" (90 min) - YouTube link
For now though, let's go step-by-step through creating our basic example.
💬 Add the Text
So we are going to start off with a new Google slideshow. We can remove the title and subtitle boxes, so we just have a blank slide to begin.
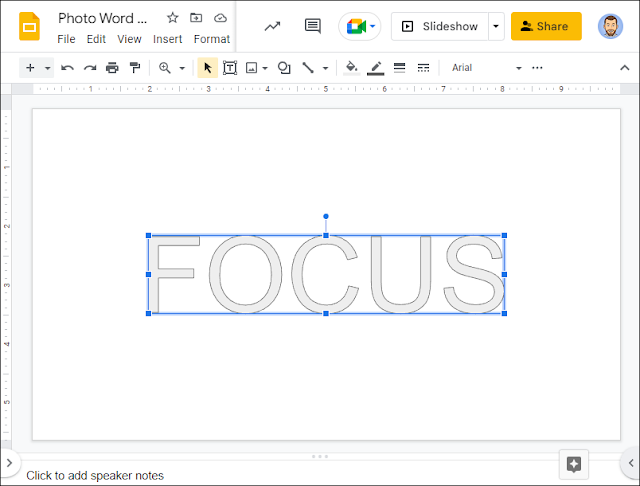
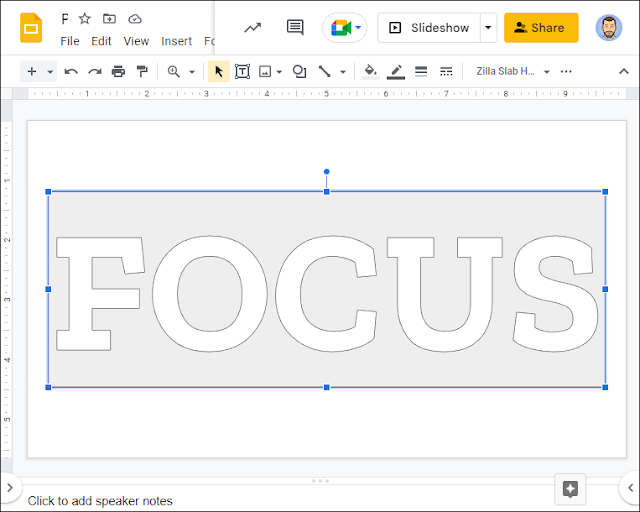
First we are going to begin by adding our word, which we will do as word art.
- We will click the "Insert" menu, and then choose "Word art" from the drop-down menu.
- Next we will type in our word using all capital letters. I find that capital letters tend to look better as they give more room for the photo to show through.
- Then press "Enter" to insert our word art.
🖌️ Format the Text
Next we need to change the font for our word art. And this is where the trick comes in to be able to make a Photo Word in Google Slides.
The problem is that most every font has the letters filled in with a solid color, and then is transparent outside of the letters. To do a Photo Word, we need the exact opposite. We need a font that is transparent inside of the letters so the photo can show through, but then has a solid color outside of the letters to hide the photo there.
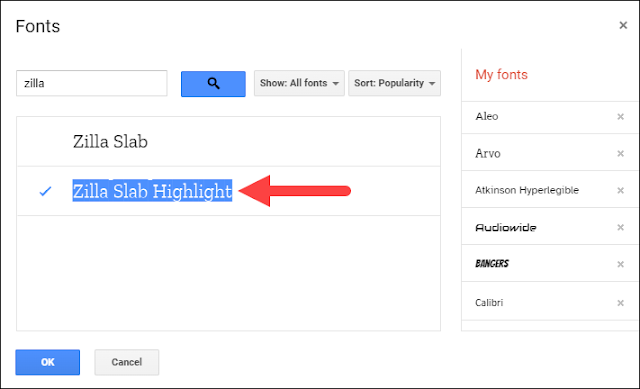
Well it turns out that out of the 1,400+ fonts that Google provides, there is exactly one font that meets this criteria. The font is called "Zilla Slab Highlight".
Zilla Slab Highlight is the inverse of every other font that Google provides. Zilla is transparent inside of the letters and colored outside of the letters, which makes it perfect for creating a Photo Word.
If you do not have that font as an option yet, do the following:
- Click on the font menu in the top toolbar.
- Choose "More fonts" from the drop down menu.
- Type in "Zilla" in the search bar.
- Click on the result for "Zilla Slab Highlight".
- And click "OK".
Now you will have Zilla Slab Highlight as an available font choice whenever you need it. At this point we will want to reformat our word art with this font:
- Select the word art.
- Use the font menu to change the word art font to Zilla Slab Highlight.
- Then click the "bold" formatting option in the toolbar to make the text bold, which will give even more room for the photo to show through.
- Then click and drag the corners of the word art to make it fit within your slide however you want.
- If needed, use the "Arrange" menu to center the word art horizontally and vertically on the slide.
🖼️ Add the Photo
Now we are ready to add our photo. The image can come from anywhere including a Google image search, public domain image sites, your Google Photos, your Google Drive, or even an image you have taken.
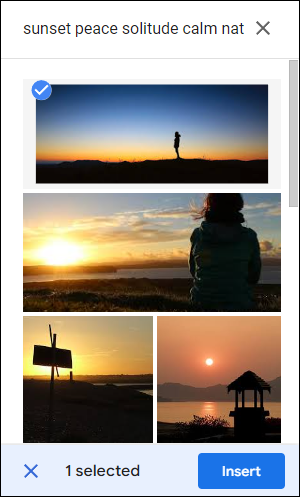
In this example we will use a Google search to find our image:
- First we will click "Insert" then "Image" then "Search the web".
- This will open a panel on the right side of the screen where we can type in our search terms to find an image we would like to use.
- Once we find the image we want, simply select it and then click "Insert".
✂️ Format the Photo
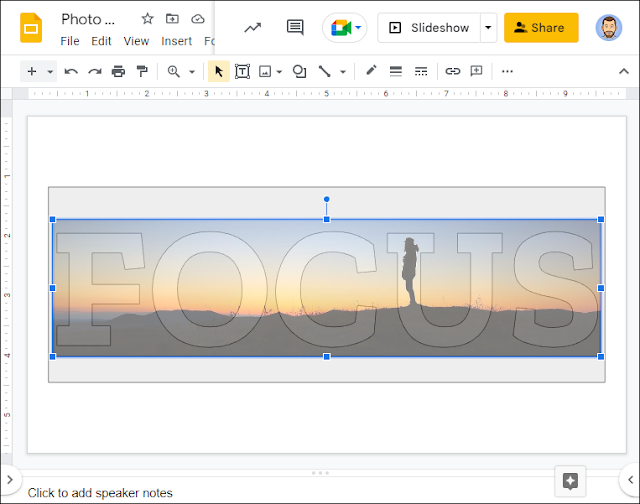
Now that the image has been inserted, we will want to line it up with our word art text. To be able to see both the photo and the word art text, it is helpful to temporarily make the photo partially transparent. Here's how:
- Click on the photo to select it.
- Next click "Format options" in the top toolbar.
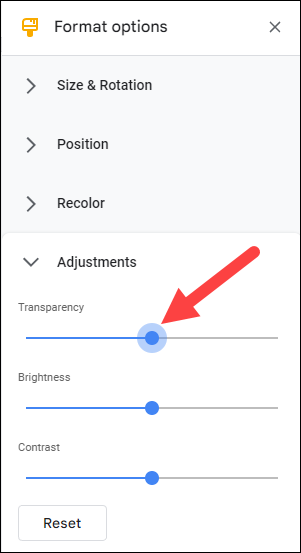
- In the "Format options" panel, click on the "Adjustments" section.
- For the "Transparency" setting, slide the control to anywhere around 50%.
- Now we will be able to see both the photo and the word art so that we can align everything properly.
Next we will want to move, resize, and crop the photo as needed so that it lines up properly with the inside portions of our word art text, but also does not extend outside of the word art box. When we are done the photo will only show through the inside of the letters, and be hidden everywhere else.
- To resize the photo, click and drag the corners.
- To crop the photo simply double-click on the image and then click and drag the black crop bars.
- To move the photo, simply click and drag the image itself.
- If we need more room to work, we can use the "Zoom" button in the top toolbar to zoom out.
✨ Combine the Text and Photo
Once we have the photo and word art text line up the way we want, it is now time to combine everything.
Reset the photo transparency:
- Change the transparency setting so the image is not long semi-transparent.
- Click the image, then "Format options" then "Adjustments" then drag the transparency slides back down to 0%
Push the photo behind the word art text:
- We can push the photo behind the word art text by selecting the image and then pressing our "Ctrl" key (or Command key) along with the "down arrow" on our keyboard.
- Each time we press Ctrl and the down arrow, the image will move further back.
- If needed we can press Ctrl and the up arrow to move it forward again.
We can now change the fill color and border color of the word art box so that it matches our slide background.
- If you want to change the slide background color, click "Slide" then "Change background".
- To change the fill color of the word art, select the word art, then click the "Fill color" button in the top toolbar (looks like a paint can).
- To change the border color of the word art, select the word art, then click the "Border color" button in the top toolbar.
- When done our Photo Word will blend in with the slide.
If we want, we can add extra items to our slide such as text boxes or other images. For example, we could add text at the top and bottom of the slide.
🔗 Share the Photo Word
When we are all done creating our Photo Word we have several options for sharing or using it.
- We can download it by clicking "File" then "Download" then "PNG image".
- We can share it through the normal "Share" button.
- We can publish it by clicking "File" then "Share" then "Publish to the web". Here we can get a published "Link" or the code to "Embed" the slide.
If you or your students create Photo Words, I would love to see what gets made. Feel free to send them to me or tag me, and if you share them on social media, use the hashtag:
#photoword
🚀 Going Further
Again the example above was a basic Photo Word. With a little creativity and some tips and tricks you can go much further and design more advanced Photo Words.
If you want to do something more advanced than this example, I also did a 90-minute live-stream webinar where we did a deep dive into creating Photo Words. In the video I go step-by-step through the process of creating four different advanced designs. You can access that video through the link below.
- "Advanced Google Slides Photo Words" (90 min) - YouTube link
🏁 Conclusion
And that's it! With these tips, you and your students can create Photo Words with Google Slides. I am excited to see what gets created!
For more creative ways to use Google Slides for teaching and learning, be sure to check out my resources at bit.ly/curts-slides
Post by Eric Curts
📮 Join the "Control Alt achieve" email discussion group
📰 Sign up for my email newsletter
🐦 Connect with me on Twitter
▶️ Subscribe to my YouTube channel
📧 Reach out through email - ericcurts@gmail.com
📗 Check out my "Control Alt Achieve" book
🏫 Bring me to your school, organization, or conference with over 60 PD sessions to choose from

.png)
.png)
.png)
.png)

.png)




Thanks for creating & sharing Eric, this is super-slick!
ReplyDeleteThis is awesome, Eric! Thanks for sharing!
ReplyDelete