 On the 4th day of Tech-Mas my true love gave to me… four rubric writers.
Note: This post is part of my "12 Days of Tech-Mas" series for 2017. You can see all of the posts for each day as they get released in the main post here: "12 Days of Tech-Mas 2017".
In reality points and percentages can only go so far when evaluating student work. If possible, we can benefit greatly from taking a step back to get a holistic view of what a student has produced. Rather than just counting the number of problems they have missed, we (and they) are better served when we look for the patterns that reveal the reasons behind the mistakes.
One tool that can help move us closer to a fair assessment of student learning is a rubric. A rubric is an evaluation tool that uses a range of criteria to assess a student's skills or performance on a continuum from excellent to poor, with qualitative descriptions for the different levels.
As useful as rubrics can be though, since they are more sophisticated, they can also be a challenge to manage in a digital world. Thankfully there are many tools that we can use to create, deploy, and grade with electronic rubrics. In this blog post we will look at four such rubric tools and how they work. The tools range from simple to complex, so hopefully you will find one that matches your needs, or inspires you to try out a rubric for an upcoming assignment.
Session Resources
- Session Agenda - Google Doc link
- Session Slideshow - Google Slides link
The Benefits of Rubrics
If you have come this far in the post, you probably do not need to be sold on the value of rubrics. However, if you are still on the fence, let me take a moment to try to push you over into the rubric camp. There are several benefits to using rubrics for you and your students.
- Rubrics let students know what is expected - By seeing how you are going to grade them, and what elements you are going to be looking for, students can have confidence that they are completing the project properly.
- Rubrics help students to be self-reflective - Even though you will end up using the rubric to assess the student, they can use it as well for self evaluation, helping them to take more ownership of their work and look for possible improvements.
- Rubrics help guide your instruction - Knowing how you will grade can help inform how you teach. A well crafted rubric will lay out expectations for the higher-level learning you want your students to achieve, which can help remind you to mirror those expectations through your teaching.
- Rubrics provide detailed assessments - Rather than just getting a single number to summarize an entire project, students can get more detailed feedback on each element of their work, helping them to understand where they can grow.
- Rubrics provide consistency in grading - Let's face it. We are humans, and grading the 100th essay, may not be quite the same as grading the 1st. Likewise our grading can be influenced by time of day, state of mind, and whether you are grading before or after your team lost the big game. Having a rubric can help bring some objectivity to the assessment process, reducing some potential bias and inconsistencies.
- Rubrics can be used in any subject - Rubrics are not just for language arts teachers. Any subject area or grade level can use rubrics. A rubric simply lets you step back and evaluate the full learning process, whatever it may be.
Four Rubric Tools
As mentioned above, there are many excellent tools for creating, deploying, and grading digital rubrics. We are going to look at four examples that span the range from basic to very sophisticated. If you have a different rubric tool you would like to recommend, please do so in the comments at the bottom of the post.
The four tools we are exploring are:
- WriQ
- OrangeSlice Teacher Rubric
- docAppender
- Doctopus and Goobric
Tool #1 - WriQ
WriQ is an add-on for Google Docs that can be used as a grammar checker (see my earlier blog post "Self-Editing Tools for Student Writing in Google Docs"). However, it also has a simple but useful rubric component included. If you are looking for a simple way to add a pre-made rubric to a student's document, this is a great option.
Here's how WriQ works:
Install WriQ (one-time process)
- First, you need to have the WriQ add-on installed for Google Docs.
- In Docs click "Add-ons" then "Get add-ons" then search for WriQ.
- Alternately you can go directly to this link: WriQ Add-on link
- Once you find the WriQ add-on, click the "+ Free" button and accept any permission requests.
 Grade Student Documents
To use WriQ, start by opening the student document you wish to grade.
- Next click "Add-ons" then "WriQ" then "Show WriQ".
- Note: The first time you use WriQ you will enter some user details to register.
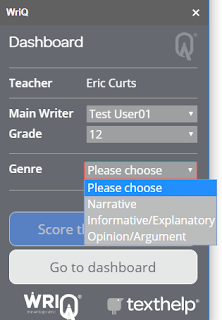
- The WriQ panel will now open on the side of the Doc.
- Here you can choose the "Main Writer" (if multiple students wrote the document), the "Grade", and the "Genre".
- Each different genre has its own pre-made rubric associated with it.
- When ready, click "Score this document".
WriQ will now do a quick grammar and style check on the document
- You can accept the suggestions as is, or you can click on any of the words in the document to change, remove, or add notes for errors.
- Categories include "Grammar", "Punctuation", and "Spelling".
- When done click "Next".
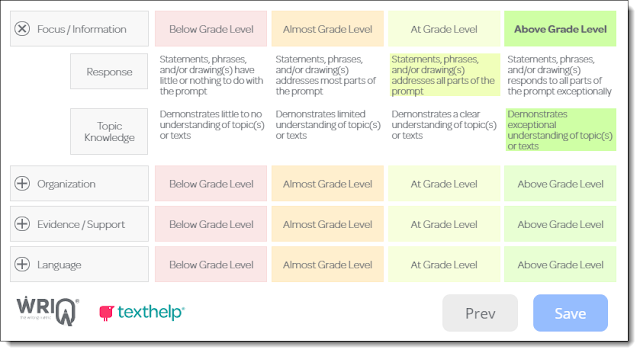
You will now get a screen with the actual rubric to grade.
- For each topic, click the plus sign to expand the individual skills.
- For each skill, click on the level you wish to assign.
- When done, click "Save".
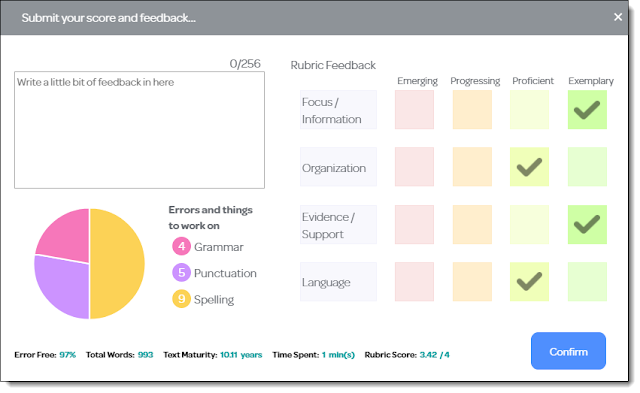
Next you will get the completed rubric.
- You can optionally type in some free form feedback.
- When done, click "Confirm".
The finished rubric will be inserted at the top of the student document for them to see.
Tool #2 - OrangeSlice Teacher Rubric
OrangeSlice is another add-on for Google Docs that can be used to grade with a digital rubric. It is a little more complicated than WriQ, but still a great tool to get started with.
For a video walkthrough for using OrangeSlice, see the video clip linked below from a webinar I did a while back on the topic if rubric tools:
OrangeSlice Video Tutorial (11 minutes)
If you would prefer written directions, here is a brief overview:
Install OrangeSlice (one-time process)
- First, you need to have the OrangeSlice add-on installed for Google Docs.
- In Docs click "Add-ons" then "Get add-ons" then search for OrangeSlice Teacher Rubric.
- Alternately you can go directly to this link: OrangeSlice Add-on link
- Once you find the OrangeSlice add-on, click the "+ Free" button and accept any permission requests.
Create Docs Rubric (one-time process - can be reused)
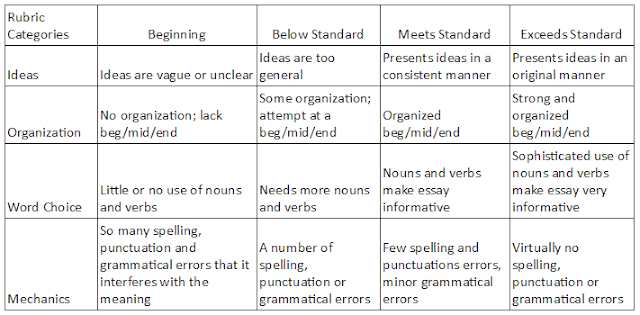
- Next, you will want to create your rubric as a table in Google Docs.
- You will later copy and paste this table into your student documents to add the rubric to their work.
- Use the "Table" menu button in Docs to create the needed table.
- Add your skills as rows and your levels as columns.
- Note: Be sure to type "Rubric Categories" in the top left corner. OrangeSlice needs that to find your rubric.
- For a sample rubric to look at or edit, you can use this link: Google Document link
- You can now copy and paste this rubric into a student's document you wish to grade.
- Better yet, copy and paste this rubric into the Doc you push out through Classroom so all of the students get the rubric ahead of time in the copy they get for their assignment.
- When you are ready to grade the student document with OrangeSlice, click "Add-ons" then "OrangeSlice" then "Score Rubric".
- This will open the OrangeSlice panel on the side of the document.
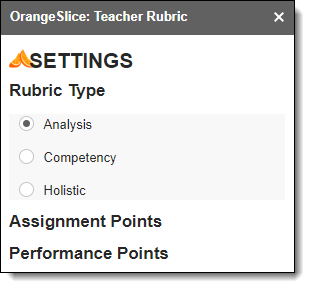
- For the rubric type choose "Analysis" (numeric) or "Competency" (letter grades) or "Holistic" (overall level).
- If you chose "Analysis" enter the point values for the rubric.
Grade Student Documents
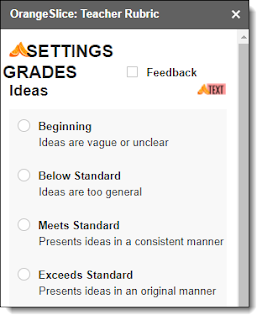
- Next click "Grades" to begin filling out the rubric scores for that student.
- Optionally you can also check the box for "Feedback" to type in free form comments for each skill.
- Optionally you can also click "Grade Adjustments" to enter values for "Extra Credit" or a "Late Penalty".
- When done click "Finished" and "Process Grade".
OrangeSlice will now color in the rubric table in the student's document to indicate your choices. It will also add a new table at the top of the document with the student's score.
Tool #3 - DocAppender
Our next tools is also an add-on, but this one is a Google Forms add-on rather than a Google Docs add-on. DocAppender allows you to create a rubric in Google Forms, which you can then fill out as needed to append the graded rubric to a student's document.
This tool is once again a little more complicated than the last, but may be a good match if you prefer to fill out a Google Form when grading a rubric.
For a video walkthrough for using DocAppender, see the video clip linked below from a webinar I did a while back on the topic if rubric tools:
DocAppender Video Tutorial (11 minutes)
If you would prefer written directions, here is a brief overview:
Install DocAppender (one-time process)
- First, you need to have the DocAppender add-on installed for Google Forms.
- In Forms click the "three-dots" button in the top right menu then "Add-ons" then search for DocAppender.
- Alternately you can go directly to this link: DocAppender Add-on link
- Once you find the DocAppender add-on, click the "+ Free" button and accept any permission requests.
Create Rubric Form (one-time process - can be reused)
- Next you will want to create a Google Form for your rubric.
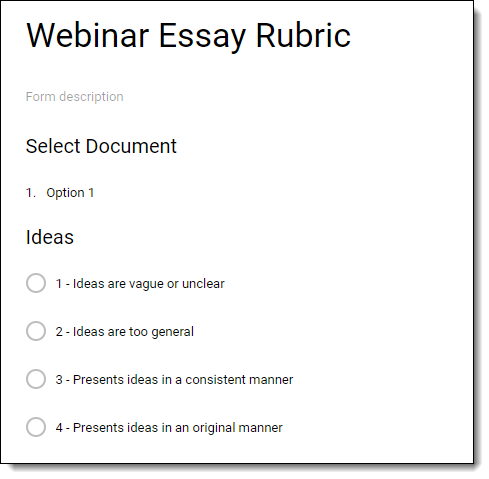
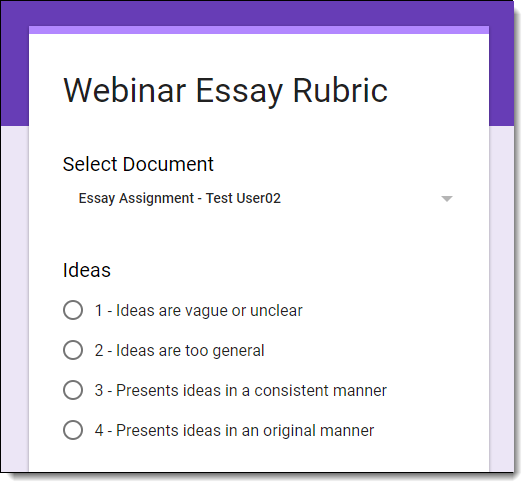
- The Form will need one "Dropdown" question titled "Select Document". The DocAppender add-on will use automatically populate the values for this question later to fill in a list of your students' document to grade.
- The Form will also need individual "Multiple Choice" questions for each rubric skill.
Configure DocAppender
When done building the Form, you can now run DocAppender to grade with the rubric.
- Click the add-on button (puzzle piece icon) in the top menu bar, then choose "docAppender" and "Open Sidebar".
- For "Step 1" browse to choose the folder in your Google Drive that holds the student assignments to be graded.
- If you use Google Classroom, you can open the "Classroom" folder, then the specific folder for your class, then the specific folder for the assignment you want to grade.
- Click "Next" when done.
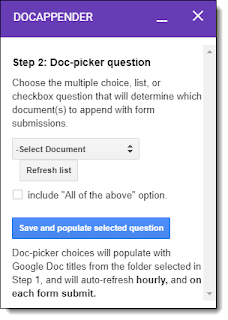
- For "Step 2" choose the "Select Document" question from the drop-down menu.
- Then click "Save and populate selected question".
- This will now pull in a list of all the student documents found in the folder you selected in Step 1.
- Click "Next" when done.
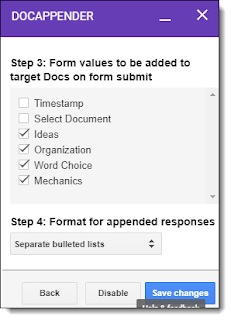
- For "Step 3" select the questions in the Form that make up your rubric.
- While on that screen you can complete "Step 4" by choosing what format you want for the rubric when it is inserted into the students' documents.
- Click "Save changes" when all done.
Grade Student Documents
Now you are ready to grade with the Form you have created.
- Click the "Preview" button (eyeball icon) in the top menu bar to open the live version of your form.
- For the "Select Document" question, choose the student document you wish to grade.
- Next fill out the rest of the questions to complete the rubric.
- When you submit the form, DocAppender will automatically take your scores and paste the completed rubric onto the bottom of the student's document for them to see.
Note: The same Form can be used with any assignment. Simply run through the DocAppender set up again to point to the new folder of documents.
Tool #4 - Doctopus and Goobric
The final tool is by far the most sophisticated, but that also means it is the most powerful. This option involves using both the Doctopus add-on for Google Sheets and the Goobric Chrome web extension.
For a video walkthrough for using Doctopus and Goobric, see the video clip linked below from a webinar I did a while back on the topic if rubric tools:
Doctopus and Goobric Video Tutorial (17 minutes)
If you would prefer written directions, here is a brief overview:
Install Doctopus (one-time process)
- First, you need to have the Doctopus add-on installed for Google Sheets.
- In Sheets click "Add-ons" then "Get add-ons" then search for Doctopus
- Alternately you can go directly to this link: Doctopus Add-on link
- Once you find the Doctopus add-on, click the "+ Free" button and accept any permission requests.
Install Goobric (one-time process)
- In addition to installing the Doctopus add-on you will also need to install the Goobric extension.
- Goobric can be install from the Chrome Web Store using this link: Goobric extension link
Create Sheets Rubric (one-time process - can be reused)
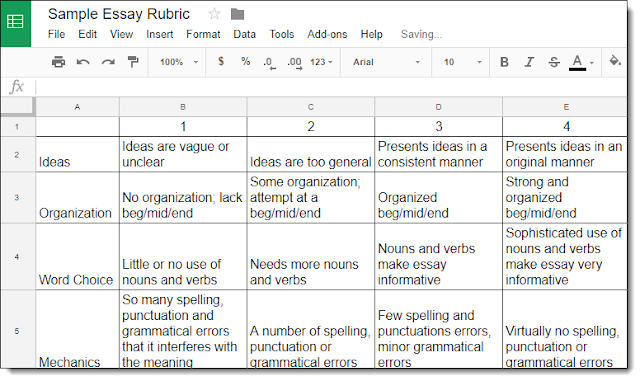
Next you will need to create your rubric using Google Sheets.
- Add your skills as rows and your levels as columns.
- For a sample rubric to look at or edit, you can use this link: Google Sheets link
Configure Doctopus
At this point you are ready to configure Doctopus for the current assignment you wish to grade. To do this you will create a new Google Sheet, pull in the student assignments, and link the rubric. Here's how:
- Create a new Google Sheet as normal.
- Run Doctopus by clicking "Add-ons" then "Doctopus" then "Launch".
- This will open the Doctopus panel on the side of the Sheet.
- For "Step 1" select if you want to pull in an assignment from Classroom, or if you want to enter a roster of students yourself.
- If you choose to use Classroom, you can then select the class and assignment you want to import.
- When ready click "Ingest assignment" which will create a list of the student documents in your Sheet.
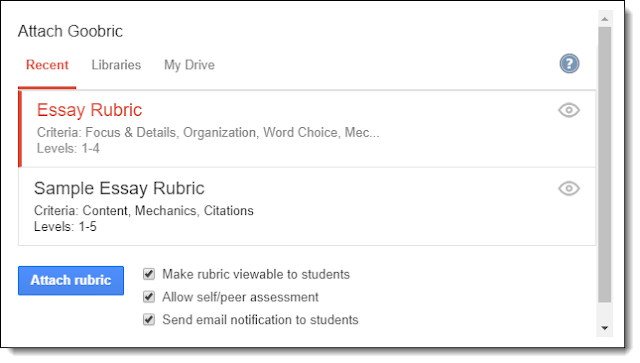
- For the next step, click the "Attach Goobric" button to link the rubric you created with this assignment.
- Browse for and select the Google Sheets rubric you created.
- Click "Attach rubric" when done.
Grade Student Documents
You are now ready to grade your student documents with the Goobric extension as follows:
- Open up one of your students documents from the assignment.
- With the student document open, click the Goobric extension in the top right corner of Chrome.
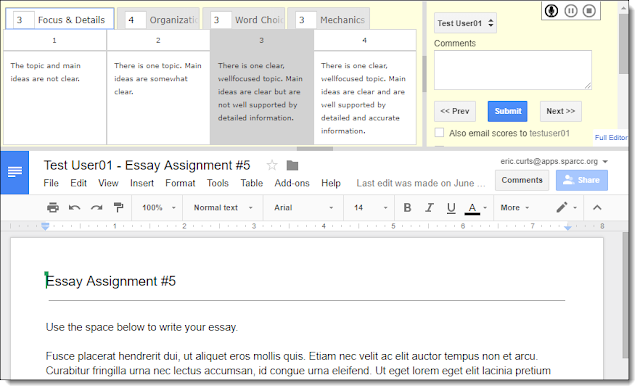
- This will open a new tab with the Goobric panel at the top and the student document below.
- You can fill out the rubric by clicking on each skill and then clicking on the score to assign.
- You can leave free form comment in the "Comments" box.
- You can click the microphone icon in the top right to record and insert voice feedback for the student.
- When done, click the "Submit" button to add the rubric scores to the student's document.
- You can the conveniently use the "Prev" and "Next" buttons to move through each student and grade their documents.
Conclusion
Although there are many tools for creating and using rubrics with Google Docs, the four we looked at in this post are a good variety of options. They range from basic to advanced, and use add-ons for Docs, Forms, and Sheets. Hopefully one of these tools will be a good match for you, to help you provide more in-depth assessment for your students, while overcoming the hurdles of working in a digital environment.
If you have other rubric tools that you have used and would like to recommend, please share the information in the comments below.
Post by Eric Curts. Bring me to your school, organization, or conference with over 50 PD sessions to choose from. Connect with me on Twitter at twitter.com/ericcurts and on Google+ at plus.google.com/+EricCurts1








Thank you, Eric. I look forward to all of your tips! They are awesome!
ReplyDeleteThanks for the info. Some of these look really helpful. Another fantastic tool that I've been using for a couple years is from Alice Keeler: https://alicekeeler.com/2016/07/03/google-sheets-rubric/
ReplyDeleteI have been using OrangeSlice Teacher Rubric for a couple of years and all of a sudden it is gone from my extensions in my Google Account. Can you tell me if anything is going on with this app?
ReplyDeleteSame problem. I can still get OrangeSlice Student Rubric, but not the Teacher Rubric. I'm really bummed. Love the app. Any one hear anything regarding this?
DeleteIt appears OrangeSlice is gone from the add-ons Marketplace. I am trying to find out more about what happened, but all I find are other people confirming they can no longer access it.
Delete