

YouTube is one of Google's best known and most used services, with hundreds of millions of videos covering any subject you can imagine.
You probably use it every week, if not every day, for both education and entertainment. But are you getting the most out of YouTube?
Even though this is a tool we are very familiar with, there are loads of tips and tricks and lesser-known features of YouTube, including picture in picture, keyboard shortcuts, managing and downloading captions, timestamps, synchronized note-taking tools, accessing public domain audio and sound clips, helpful extensions, converting videos, embedding videos, and more!
These features can be especially helpful in schools, to help provide the best educational content and experience for our students.
See below for a 45-minute video where I did a deep dive into all 18 of these YouTube tips and tricks. I have also included links to the associated session resource document and slideshow, as well as detailed directions in the post below.
And be sure to let me know your YouTube tips that I have missed!
▶️ Training Video (45 minutes)
Or watch on YouTube at: https://www.youtube.com/watch?v=luiOjC6V6kk
🧰 Session Resources
- Resource Document - "YouTube Can Do That?!" - Google Docs link
- Session Slideshow - "YouTube Can Do That?!" - Google Slides link
⏱️ Adjusting Playback Speed
The playback speed for YouTube videos can easily be changed. You can speed up a video to save time, since you can usually listen faster than someone can talk. Or if needed, a video could be slowed down to be able to follow the content more thoroughly.
To change the playback speed of a video:
- Click on the settings gear icon for the video you are watching.
- Then click "Playback speed" from the pop-up menu.
- You can now choose a slower speed such as 0.25, 0.5, or 0.75
- Or a faster speed such as 1.25, 1.5, 1.75, or 2.
- You can even click "Custom" if you need to tweak it more.

🖼️ Picture-in-Picture Mode
Picture-in-picture mode allows you to pop out a YouTube video into its own floating window. As you browse other webpages the video will stay on top, making it easy to continue watching the video while working on other content.
To turn on picture-in-picture mode:
- Right-click on the current video you are watching.
- A pop-up menu will appear but DO NOT click on any of its options.
- Instead, right-click a second time.
- A different pop-up window will now appear.
- Click the "Picture in picture" option here.
Watching in picture-in-picture mode:
- Now that you have turned on picture-in-picture mode, the video will appear in its own floating window.
- You can watch the video by clicking the play button in the floating window.
- You can click and drag the video around the screen.
- You can drag the edge of the video to resize it.
- You can move to other tabs and windows, and the video will continue to be visible and play.
- When done with picture-in-picture mode you can close out of the floating window.

💬 Captions
Auto-generated Captions
If a video is not closed captioned by its creator, you can still view captions for the video. This is because YouTube uses artificial intelligence to convert speech to text, which auto-generates captions for every video.
To turn on the auto-generated captions:
- Click on the settings gear icon for the video you are watching.
- From the pop-up menu click on "Subtitles/CC".
- Next click on "English (auto-generated)".
- You can now view the captions while watching the video.

Adjusting Caption Settings
In addition to turning on captions for any video, you can also adjust how the captions are displayed. This can make it easier for you or your students to be able to see them when watching a video.
To adjust caption settings:
- Click on the settings gear icon for the video you are watching.
- From the pop-up menu click on "Subtitles/CC".
- Next click "Options" in the top right corner.
- From here you can adjust the caption font, color, size, and more.

Translating Captions
YouTube captions can also be translated into a wide range of languages. This can be especially helpful for a language learner to see the captions in their own language, while listening to the video in the language they are learning.
To translate the captions:
- Click on the settings gear icon for the video you are watching.
- From the pop-up menu click on "Subtitles/CC".
- If the "Auto-translate" option is not available, temporarily choose "English (auto-generated)" to enable the option.
- Next click "Auto-translate" from the pop-up menu.
- You can now scroll through a large list of languages to choose the one you want for translation.
⬇️ Downloading Transcripts
As mentioned above, YouTube's speech-to-text technology automatically generates captions for any video. Those captions can also be downloaded as a transcript. This could be helpful, for example, for a student to have a set of editable text notes to go along with a video they are watching.
To download the transcript for a video:
- Click the "3-dots" button underneath the video.
- Then click "Show transcript" from the pop-up menu.
- The full transcript will be displayed in a panel on the right, with a timestamp for each line of text.
- Using your mouse, click and drag down to select all of the transcript text.
- Once you have all of the text selected, you can copy it.
- You can now paste that text into a Google Doc or Google Sheet or any other tool you prefer.
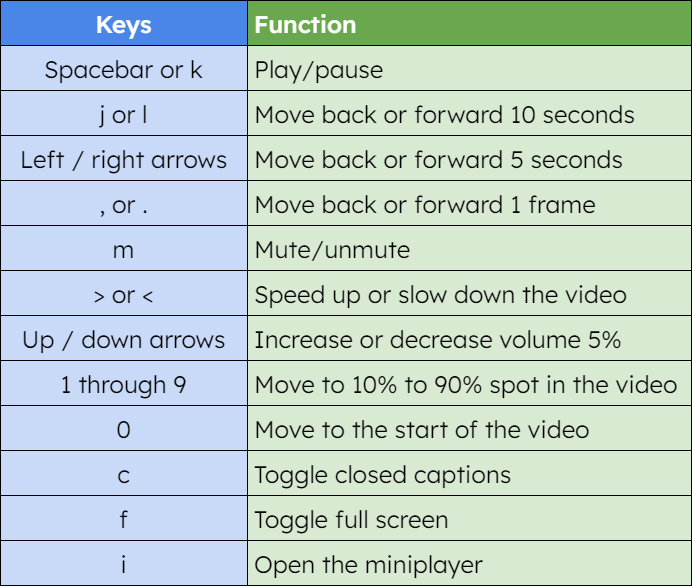
⌨️ Keyboard Shortcuts
Below are some common keyboard shortcuts that can be used with YouTube. For a quick list of all the available shortcuts, press Shift and ? when on YouTube to get a pop-up list.
🍪 Reduce Distractions
YouTube's "No Cookies" mode can help remove distractions when viewing videos such as:
- Full screen video
- No comments
- No recommendations on the side
Simply add a "-" to the right of the "t" in the YouTube web address.
- For example this: www.youtube.com/watch?v=8MniheLpiks
- Would become this: www.yout-ube.com/watch?v=8MniheLpiks

✂️ Make Just a Clip of a Video
Sometimes you may want to watch or share just a portion of a video, Perhaps it is a part that explains a concept or emphasizes a point or demonstrates a process. YouTube makes it easy to click just a portion of a video (up to 60 seconds) and share with others.
- First find the video you want to take a clip out of and determine the general part of the video you want.
- Next click the "Clip" button below the video.
- This will open a panel to the right where you can specify the details of the clip.
- You can drag the clip on the main video timeline to position it on the content you want to capture.
- You can also drag the start and end points of the clip on the right to fine tune it.
- When done add a "Title" and then click "Share clip".
- You will now get a link that you can copy and share with others however you wish.
- Anyone who clicks the link will be able to watch just the portion of the video that you have selected.

💫 Convert YouTube Videos into GIFs
Although you can clip videos, you may also want to convert the clips into some other format, such as a GIF, which is easier to share in other tools and mediums. An animated GIF is an excellent option for a short clip of a video, as long as you do not need the audio.
There are lots of tools that can convert a YouTube video into a GIF. One easy example is GIFRun:
- First find the video you want to turn into a GIF and copy the web address of the YouTube video.
- Next go to the GIFRun website at: https://gifrun.com/
- Paste in the copied video link and click "Get Video".
- You will now get a preview of the video, and can make several adjustments as needed.
- Duration - How long the GIF should be, up to 15 seconds maximum.
- Start Time - Where in the video you want to begin.
- Edit Size - How big the GIF should be
- FPS - How many frames per second the GIF should have
- Filters - Any special filters you would like applied to the GIF
- Add Text - Any message you would like superimposed on the GIF
- When done click "Create GIF"
- After the GIF gets generated you can download the final product to use however you want.

📄 Playing Videos in Google Docs
At the moment, Google Docs does not actually support embedding a playable YouTube video inside of a document. Over the years there have been several clever workarounds and alternatives (many mentioned in an older blog post of mine).
Google has added a new option for video in Docs, which is the video preview feature.
First start by adding a link to a YouTube video inside your document…
- Option #1 - You can simply paste in the YouTube video link
- Option #2 - Or you can click on the link and let Docs turn it into a "chip"
- Option #3 - Or you can add an image, such as a thumbnail for the image, and then add the video link to that image by selecting the image, then clicking "Insert" and "Link"
Now anyone with access to the document can click on the link to access the video preview option:
- When you click on the link, you will see a small animated thumbnail showing the first few seconds of the video.
- You can then click on the "Open preview" link in the bottom right corner of the thumbnail.
- The video will now open in a popup window in the bottom right corner of the Google Document and start playing automatically.
- You can click and drag the top left corner of the video window to make it larger or smaller.
- The video will stay on top and play while you continue to work in the document allowing you to watch the video and do your work.
- Normal video functions are still available such as volume, captions, playback speed, and more.
- When done you can close the video window.

🎨 Playing Videos in Google Drawings
Although Google Drawings does not have an option to insert a video, it actually is possible through a clever workaround. Because Google Drawings is very similar to Google Slides, you can use Slides to help embed a video in Drawings.
Here's how to play a YouTube video in a Google Drawing:
- First create a temporary slideshow with Google Slides.
- Insert the desired video in that slideshow as normal (click "Insert" then "Video").
- Now that the video has been embedded in the Slide, simply select and copy the video (for example, press Ctrl + C).
- Next go over to the Google Drawing where you want the video to be.
- Now simply paste the copied video into the Google Drawing (for example, press Ctrl + V).
- The video will paste into the Google Drawing just like it was in the slideshow.
- Users can click on the video in the Drawing and it will play as normal.

Example: Backgammon template
⏰ Adding Timestamps
When a video is longer, it can be very helpful to include timestamps in the video description. Viewers can click on a timestamp to jump directly to a section they are interested in.
To add timestamps to one of your videos:
- First watch your own video and take note of the spots where you want to add timestamps. You will need to write down the exact time each spot is in your video in hours, minutes, and seconds, as well as a title or description for that spot.
- Now go into the edit mode for your video through your YouTube Studio page.
- In the description simply add timestamps in plain text in the format hh:mm:ss followed by a description of that part of the video.
For example:
0:00:00 - 👋 WELCOME
0:04:25 - 🔗 IMPORTANT LINKS
0:05:08 - 📧 UPDATES
0:05:42 - 📆 UPCOMING EVENTS
0:14:36 - 🆕 WHAT'S NEW IN GOOGLE WORKSPACE
After you save the changes to the video description, anytime someone views the video the timestamps will automatically be clickable and will jump them directly to those spots in the video when clicked.

🎈 360 Degree Videos
In addition to regular videos, YouTube also supports 360-degree videos filmed from all angles. This can provide students with a much more immersive experience for the content they are watching, being able to look up, down, left, right, in front and behind, to really put themselves into the scene and gain a better understanding.
To find a 360 degree video:
- Begin by conducting a standard search in YouTube for content you are interested in.
- Now click the "Filters" menu option below your search bar.
- In the "Features" section, click on "360°"
- You will now get videos that match your initial search term, but also have been recorded in 360 degrees.
- When you play the video you can now look in all directions by clicking and dragging with your mouse on a computer, or by tilting and moving your phone if viewing on mobile.

🎵 Free Music and Sound Effects
YouTube provides hundreds of free sound effects and over one-thousand free music tracks for creators to use in their videos, or in anything else they make. These audio files are easy to search through and download.
- First go to the YouTube Studio page for your channel at https://studio.youtube.com/
- Then on the left hand panel, scroll down and click on the section for "Audio library".
- You can now choose between "Free music" and "Sound effects".
- If you choose "Free music" you can search by keyword or narrow down your search with filters including genre, mood, and duration.
- If you choose "Sounds effects" you can search by keyword or filter by category.
- You can click the play button to listen to any of the audio tracks.
- You can click the "Star" button to add the tracks to your list of "Starred" files.
- If you want to use the audio though, all you have to do is click on the "Download" link to download your own copy and use in your projects.

🔌 YouTube Extensions
Chrome Web Extensions are a great way to add extra features and tools to your Chrome browser. I have a Google Sheet with over 100 of my favorite extensions covering a wide range of helpful extensions.
When it comes to YouTube there are many extensions designed to enhance your YouTube experience. Here are a few of my favorites:
Return YouTube Dislike - Chrome Web Store link
- In December of 2021 YouTube removed the ability to see the number of dislikes a video has received.
- Although there are reasons behind this decision, being able to see the likes versus dislikes for a video can help a user determine the value of a video.
- This extension re-enables the dislike count for videos, showing all archive data, as well as new data collected through the extension since the change.

FreshView for YouTube - Chrome Web Store link
- One missing feature of YouTube is the ability to hide videos you have already watched, as YouTube will frequently suggest videos you have seen before.
- This extension simply hides videos that you have already watched, making sure you are only seeing recommendations for videos that are new to you.
- If needed you can also adjust a "View Threshold" to indicate what percent of a video you need to have seen for it to be marked as having been watched.

PocketTube: Youtube Subscription Manager - Chrome Web Store link
- If you are subscribed to a large number of YouTube channels it can be difficult to find the new content you are looking for.
- PocketTube allows you to create "Subscription Groups" where you organize your YouTube channel subscriptions into categories based on topics you create.
- You can use these groups to filter the videos you see to find just what you want.

ReClipped - Chrome Web Store link
- Take notes while watching a YouTube video.
- Add timestamps to your notes.
- Add screenshots to your notes.
- Jump to spots in the video by clicking in your notes.
- Download your hyperlinked notes.
- Free Plan available for everyone, and Basic Plan available to students and teachers for free.
- Note: Other extensions for taking notes in YouTube include Clarity, YiNote, MoocNote, Bookmark It, LunaNotes, and more.

Post by Eric Curts
📮 Join the "Control Alt achieve" email discussion group
📰 Sign up for my email newsletter
🐦 Connect with me on Twitter
▶️ Subscribe to my YouTube channel
📧 Reach out through email - ericcurts@gmail.com
📗 Check out my "Control Alt Achieve" book
🏫 Bring me to your school, organization, or conference with over 60 PD sessions to choose from
No comments:
Post a Comment