

Captions are a powerful tool for all learners.
- They can help beginning readers to connect the spoken word with the written word.
- They can help language learners who are still learning the language.
- They can help when you are in a noisy or distracting environment.
- And they can simply help you catch things you may have missed otherwise.
I personally use captions for everything I watch and they have helped me tremendously.
Thankfully most audio and video now has captions as an option.
- YouTube has auto-generated captions
- Google Slides has Live Captions when presenting
- Google Meet has a caption option any user can turn on.
But what if you come across something that doesn't provide captions? Well Google Chrome has you covered with built-in Live Captions.
▶️ Tutorial Video (7 minutes)
Or watch on YouTube at: https://www.youtube.com/watch?v=cbVEFEBv44U
✅ Turning on Live Captions in Chrome
So let's say you come across something online that doesn't have its own option for captions.
- It could be an audio file such as a podcast or other audio recording.
- It could be a video on a platform that doesn't offer captions, or simply a video someone sent to you.
For our example we will use an episode from one of my favorite podcasts "99% Invisible".
I can play this podcast episode in my Chrome browser, but it is just audio. There are no captions available for it.

Thankfully Chrome can help us with this.
Whenever anything with audio is playing inside of Chrome, you will get a special "Media Control" icon that looks like a music note in the top right corner of your Chrome browser window, to "Control your music, videos, and more".
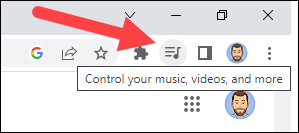
- Simply give a click on this "Media Control" button.
- In the drop-down window you will see a toggle button for "Live Caption".
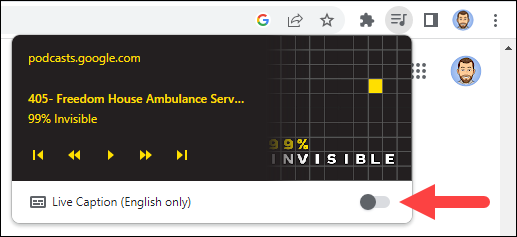
- Turn this on to enable Live Captions in Chrome.
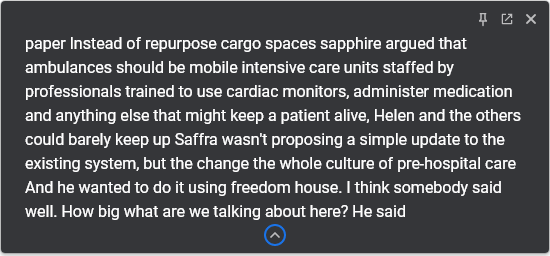
- This will open a floating window that will display real-time live captions for whatever audio is coming through Chrome.

Note: If the Live Caption option does not show up for you, you may need to go into your Chrome settings to enable it. For example, on my Chromebook the Live Caption option does not appear when I click the media icon. Instead here's how to turn on Live Captions in the Chromebook settings.
- First open the system menu in the bottom right corner, and then click the gear icon to access the Chromebook settings.
- On the settings page click the "Accessibility" section.
- Then click on the option for "Audio and captions".
- You will now see an option for "Live Caption" that you can toggle on or off as needed.

💬 Using Live Captions in Chrome
Now that we have Live Captions turned on, let's explore how to use it.
- You can click and drag the Live Caption window to move it anywhere you want.
- You can change the size of the Live Caption window by clicking on the arrow at the bottom.
- This will switch you between a small window and large window where you can see more of the text at one time.
- You can even switch to a different tab or window or even minimize Chrome entirely and the Live Captions window will stay on top and viewable.
- This allows you to continue to access the captions no matter what you are working on.
- If you need to quickly get back to the original tab with the audio, you can click on the "Back to tab" button in the top right corner of the Live Captions floating window.

When you are done with the captions you can close the Live Caption window or you can toggle off Live Captions entirely with the media button.

Anytime you need you can simply toggle the Live Captions back on or off.
⚙️ Customizing your Live Captions
You can also make changes to the appearance of the Live Captions such as text color, font style, text size, background color, and more. For example on on Windows computer, here's how you do that:
- In Chrome, click on the "3-dots" button in the top right corner.
- Then choose "Settings" from the drop-down menu.

- This will open your "Settings" tab.
- On the left side, click on the "Accessibility" section.
- Finally click on the option for "Caption preferences".

This will open the captions settings for your specific computer. Depending on what type of computer you are using, your caption setting may vary, but likely will include options to change the caption color, style, size, and more.

Note: On a Chromebook you can get to these settings as follows:
- First open the system menu in the bottom right corner, and then click the gear icon to access the Chromebook settings.
- On the settings page click the "Accessibility" section.
- Then click on the option for "Audio and captions".
🏁 Conclusion
And that's it! Captions can be a powerful tool to help all learners, and Chrome makes it super easy to add Live Captions to any audio or video.
Be sure to check out the other blog posts and videos in my series on Google Chrome to pick up more tips and helpful ideas here bit.ly/chromemas22

Post by Eric Curts
📮 Join the "Control Alt achieve" email discussion group
📰 Sign up for my email newsletter
🐦 Connect with me on Twitter
▶️ Subscribe to my YouTube channel
📧 Reach out through email - ericcurts@gmail.com
📗 Check out my "Control Alt Achieve" book
🏫 Bring me to your school, organization, or conference with over 60 PD sessions to choose from
No comments:
Post a Comment