
I am old enough to remember when the Internet was all text-based, so I am thrilled that it has been full of images for a long time now. As awesome as that is, online images can bring along some problems.
Some images may be deceptive, saying they are something different than they really are. This could come from Photoshopping the picture or simply claiming it represents something else.
Or some images could have text in them, but because it is a picture, the text can't be selected. This can be a challenge for a student who wants to have the text read aloud or translated into a different language.
Thankfully we have a tool built right into the Chrome web browser to help with all of these problems. That tool is Google Lens.
▶️ Tutorial Video (7 minutes)
Or view on YouTube at: https://www.youtube.com/watch?v=IhsMeOJK-nY
🦈 A Fishy Image
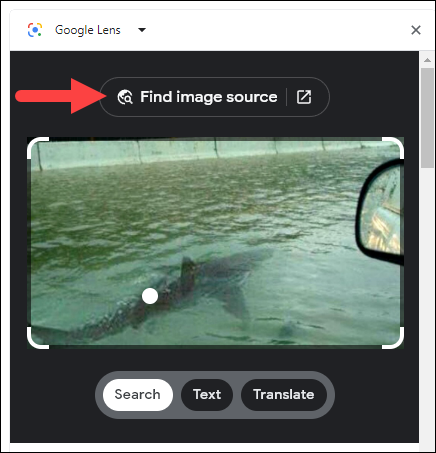
So let's say you come across this picture on the Internet:

Supposedly this is a picture of a shark swimming on the highway. The story is that there was a hurricane and the water flooded the highways so bad that sharks were able to swim in from the ocean. So here we have a car driving on a flooded highway with a shark right beside their car.
Is this picture for real? What can a student do to figure that out?
🔎 Investigating an Image
So, Google Lens is an image search tool that is built right into the Chrome web browser. You can use it to find out more information about any picture that you come across. This can be very helpful when trying to determine the authenticity of an image.
Here is how it works:
- Once you find the image you want to find out more about, begin by right-clicking on the image.
- From the pop-up menu, choose "Search image with Google Lens".

- This will open a new tab with the Google Lens panel on the right side.
- The Google Lens panel will list image thumbnails and links to websites where this picture has been discussed.

- Just scrolling down the list of thumbnails and reading the headlines may be enough to give you all of the information you need, such as these websites indicating that the shark photo is fake or a hoax.
- However you can click on any of these matches if you want to open up the website to read it for more information.
- For even more details, you can also click on the link at the top of the Google Lens panel that reads "Find image source".
- This will open up a regular Google Search page with sites that also use your original image.
- Again the titles and descriptions of the pages may be enough to inform you about the image, but you can always click on the sites to visit those pages and read more details.

🔊 Reading Text from an Image
Another helpful use of Google Lens is to pull text out of an image and then have that text read aloud or translated. Here's how that works:
So let's say we come across an image on the Internet that has text in the picture. In this case we have an image that is a scanned page from the book "Alice in Wonderland".

Now because this is a picture with text inside of it, rather than just actual text, we can't select the text. If a student uses assistive tech tools to read text aloud or translate text, they may not be able to use those tools on this image.
Well that is where Google Lens comes in to help again!
- First we begin by right-clicking on the image.
- From the pop-up menu, choose "Search image with Google Lens".
- Like before this will open the Google Lens side panel with matching sites.
- However this time we are going to use the "Text" and "Translate" buttons.

- First let's click on the "Text" button below the image.
- We can now click and drag to select the text we want, or just click the "Select all text" button.

- Now that Google Lens has pulled the text from the image, we can can click the "Listen" button to have the text read aloud to us.

Note: There is also a "Copy text" button here if you want to copy the text from the image and paste it into something else, such as a Google Doc.
💬 Translating Text from an Image
Another option we have is for the text from the image to be translated.
- From the same Google Lens panel we can click on the "Translate" button below the image.
- Above the image we will now have two drop down menus to choose the language we are translating from and the language we are translating to.

- Once you have chosen your languages, the translated text will appear in the Google Lens panel.
- Again you can click the "Listen" button to have the translated text read aloud.
🏁 Conclusion
And that's it! Google Lens is a great tool to help students, and all of us, find out more information for any image we come across online, as well as have the text from that image read aloud or translated. And thankfully this tool is built right into Chrome and is only a right click away.
Be sure to check out the other blog posts and videos in my series on Google Chrome to pick up more tips and helpful ideas here bit.ly/chromemas22

Post by Eric Curts
📮 Join the "Control Alt achieve" email discussion group
📰 Sign up for my email newsletter
🐦 Connect with me on Twitter
▶️ Subscribe to my YouTube channel
📧 Reach out through email - ericcurts@gmail.com
📗 Check out my "Control Alt Achieve" book
🏫 Bring me to your school, organization, or conference with over 60 PD sessions to choose from
No comments:
Post a Comment